We are so excited to have you in ballet class at Dublin Dance Centre & Gymnastics! To prepare you for class, you’ll need your black leotard and pink, footed tights and pink ballet slippers. To ensure a proper fit, please have a professional fit your ballet slippers at a dance-supply store. House slippers are very slippery and are dangerous for little ones to wear in the studios. Ballet slippers should not have much room to grow. They should fit the length and width of your dancer’s foot snuggly. Luckily, Dublin Dance Centre & Gymnastics has wonderful fitters at the local dance supply store just a few blocks away, so a great fit can be achieved with one of their many brands of ballet slippers. In the Recreational ballet classes, a full-soled ballet slipper will help your dancer develop the strength and flexibility in his or her foot, while the Placement level ballet dancers may want to consider a split-sole slipper to attain maximum flexibility in his or her arch.
Before you come to class in your new ballet slippers, you’ll need to make sure that all the elastics are sewn. Many brands of soft ballet slippers come with the heel elastic already sewn on, but completing the sewing of the elastics will ensure that your shoes are secure to your foot and supporting your arch shape while preventing plantar foot problems from stepping on a knot. Use the guide to know where to sew your elastics and how. Tying the ends and tucking them under your foot is not an acceptable way to manage your elastics.
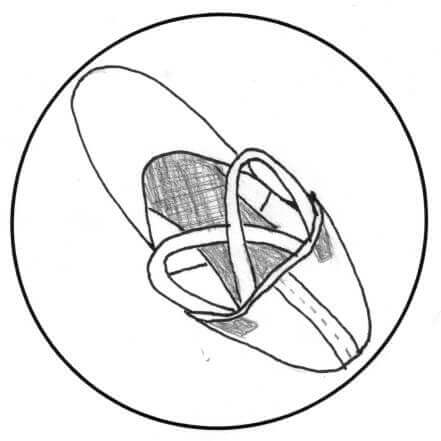
First, you’ll want to decide the design of your elastics. For most full-sole ballet slippers for Recreational levels, a single strap will be sufficient to keep your shoe on and support the shape of your arch. For split-sole slippers in Placement-level classes, you will need to criss-cross your elastics. The sewing technique is the same for each design, but the quantity of elastic and placement is different. For single strap design, you will need two pieces of about six-inch length each. For the criss-cross strap design, you will need four pieces of about six-inches of elastic.
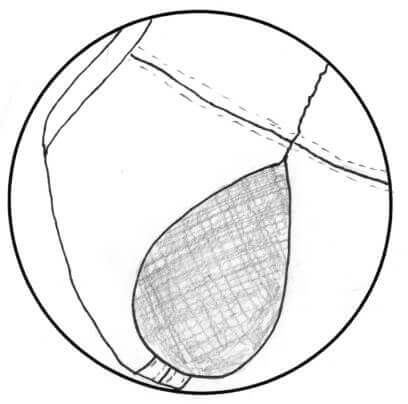
Next, determine where the elastics will be sewn. For a criss-cross strap design, if your pair did not come with the heel elastics already sewn on, you’ll want to do that first. Line up one end of two pieces on either side of the back heel seam about ½ inch away from the factory stitching. These pieces may need to be angled a little toward the outside to lie flat when the shoe is on the foot. Pin all four elastic pieces here before measuring the elastics at the instep. For both the single strap design and the criss-cross strap design, determine the position of the mid-foot end by folding the heel of the shoe down at the very edge of the leather sole. When you flatten the shoe material, you will see a diagonal line that is created and the crease of your fold. Make a pencil line in the draw-string casing at the crease and a pencil line inside the diagonal fold on the canvas lining of each side. This will be your guide for the angle and the placement of the mid-foot elastic end.
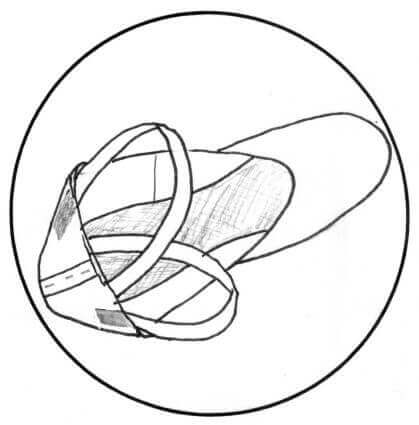
Put the shoe on each foot and measure how long each elastic piece should be. Check the heel elastic now, too, to ensure that the elastics lie flat as they come around the ankle. Pin the mid-foot elastics so that they follow your line-guides and lie flat against the mid-foot. Try pointing your foot. The technique to measure the mid-foot elastics works for most foot shapes, but for those dancers with very high arches, the mid-foot elastics may have to be closer to the mid-foot seam of the shoe in order to pull up the fabric at the natural arch of the foot.
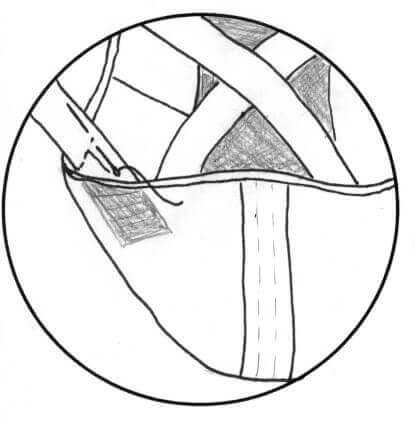
Once all sides of the elastics are pinned, you are ready to sew. The sewing technique is the same for both elastic designs. A straight stitch is used along the factory stitching below the drawstring. Carefully avoid sewing through the drawstring by pushing the drawstring up to the top of the casing so you can sew along the factory stitching. Sew all ends of your elastic before class. It is dangerous to dance with safety pins holding your elastics on! Thankfully, sewing your elastics doesn’t take very long, but it can create a beautiful line of your arch while keeping your shoe firmly on your foot.
Congratulations on reaching this exciting milestone in your ballet training! Now it’s time to get your shoes ready.
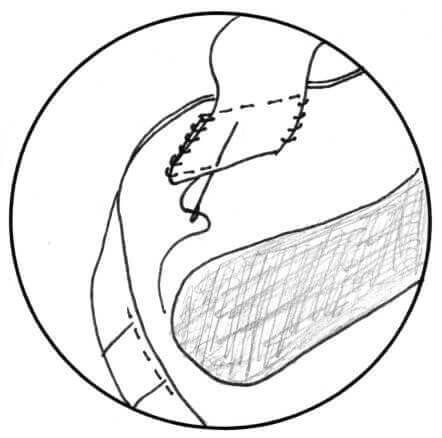
The first step is the ribbon. Your ribbon has probably come in one, long piece. Fold it in half and cut it, then fold each piece in half and cut again so that you have created four equal lengths of ribbon. Take a match and carefully burn each edge to prevent fraying. This should be done with an adult’s supervision.
The position of your ribbons should be close to the place you would sew the mid-foot elastics on your ballet slippers. Fold down the heel satin at the edge of the leather sole and mark with a pencil the fold at the drawstring casing and the diagonal that the crease made. Pin all four pieces of ribbon, put your shoes on, and tie your ribbons to make sure that this angle allows the ribbon to lie flat when you point your foot.
Now it’s time to sew. Use a strong, cotton thread that is the same color as your pointe shoes. You will want a sharp needle and a thimble to protect your fingers while pushing through all the layers of fabric. Use a straight stitch across the factory stitching of the drawstring being careful not to catch the draw-string in your sewing by pushing it toward the top of the casing with your thumb and forefinger as you sew. Now, use a whip stitch to complete a square around the ribbon. Be very careful when sewing the whip stitch that you only catch the canvas liner of the pointe shoe and don’t push the needle all the way through. This will ensure a beautiful line on your foot without stitch marks and thread marring the satin. When all four ribbons are sewn, it’s time for elastics.
At your pointe shoe fitting, you should have received advice about the design of your elastics to best support your foot in your shoe. If you were advised to either use a criss-cross strap design or a single-strap design, realize that the determination of the mid-foot strap placement will be similar to the placement of your ribbon. Usually, the shape of a dancer’s foot requires the elastic to be sewn overlapping but a little to the front of the ribbon in the same diagonal as the ribbon. About 2/3 of the elastic should be overlapping the ribbon with 1/3 shifted toward the toes of the shoe. Always pin and test with a pointed foot to make sure that the elastic is lying flat and is supporting your arch right at its highest. If you were advised to use a criss-cross strap design, follow the instructions for your ballet slippers. You may want to keep your elastics a little more secure by sewing the square around your elastics, too. For a single-strap design, sew the outside end of the elastic at the heel, following the instructions for your ballet slippers. The inside end is sewn at the mid-foot following the measurement guide as detailed above.
A strong cotton thread that matches your shoe color, a sharp needle, a thimble, a small pair of scissors, matches for ribbons. Many dancers keep a small stitch kit in their dance bags in case they pop an elastic during class. Dancing with safety pins holding your elastic or ribbons on is dangerous! Emergency stitch kits are available to purchase, but the thread is often the wrong color, the needles are not sharp or small enough, and the supplies are worth much less than the price of convenience. It is recommended that elastics and ribbons be sewn by hand to avoid things like sewing through the satin or catching the drawstring through the casing.
Once a dancer has her pointe shoes, it is also recommended that she be responsible for the sewing and care of her own shoes. This has resulted in late-night sewing sessions and sore fingertips for countless dancers. A dancer’s pointe shoes are an extension of her feet and need to be sewn with great care and attention to detail to properly support the foot and create the beautiful line that makes classical ballet appear effortless and ethereal.